A loose crimp doesn’t announce itself. The connector clicks together, the panel produces power, and everything looks fine — until months later, when a slightly higher contact resistance turns into a hot spot, a melted housing, or a failed string. Most solar fires that trace back to connectors don’t start with a bad connector; they start with a bad crimp.
This guide covers exactly how to crimp MC4 connectors correctly, from stripping the cable to the final pull test — and since we manufacture these connectors and test crimped samples by the thousands, we’ve included the quality checks a factory uses that most DIY guides skip. Whether you’re terminating a couple of extension cables or evaluating whether your team should crimp in-house at all, this walks through the full process.
What You’ll Need Before You Start
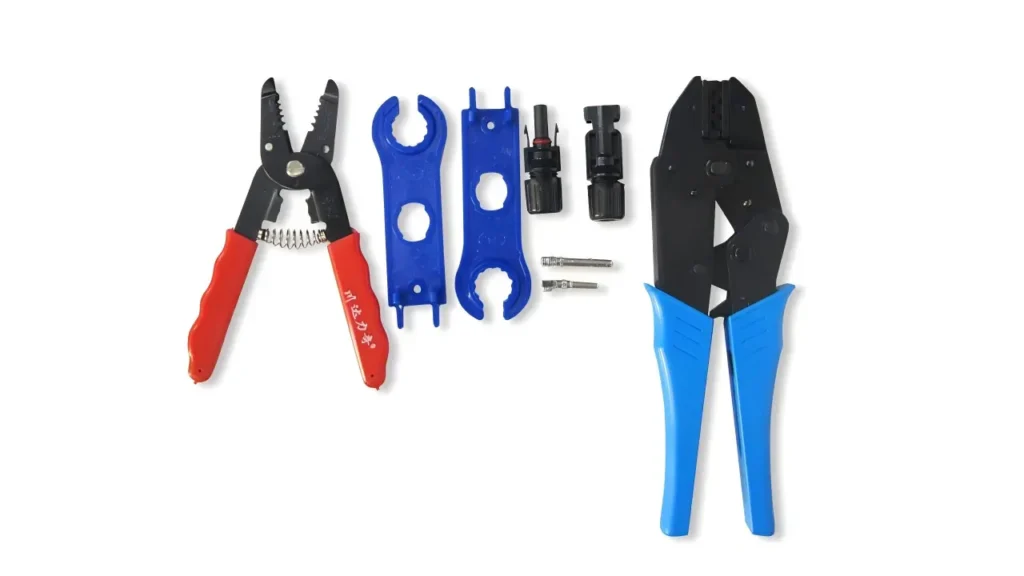
MC4 Crimping Tool (Why You Can’t Use Regular Pliers)
A dedicated MC4 crimping tool applies even, controlled pressure around the full circumference of the pin, forming a consistent hexagonal or circular crimp. Standard pliers squeeze from two flat points, which can crush the pin unevenly, leave gaps where strands aren’t fully compressed, or damage the contact surface entirely. If you’re doing this more than once, the tool pays for itself the first time it prevents a callback.
Wire Stripper, Solar Cable, and MC4 Connector Pairs
You’ll also need:
- A wire stripper sized for your cable’s insulation
- Solar-rated cable, typically 4mm² or 6mm² depending on your run length and current
- Male and female MC4 connector pairs — check they’re rated for your system’s voltage and current before buying in bulk
- A multimeter, for polarity and continuity checks after crimping
How to Crimp the Male MC4 Connector [Step-by-Step]
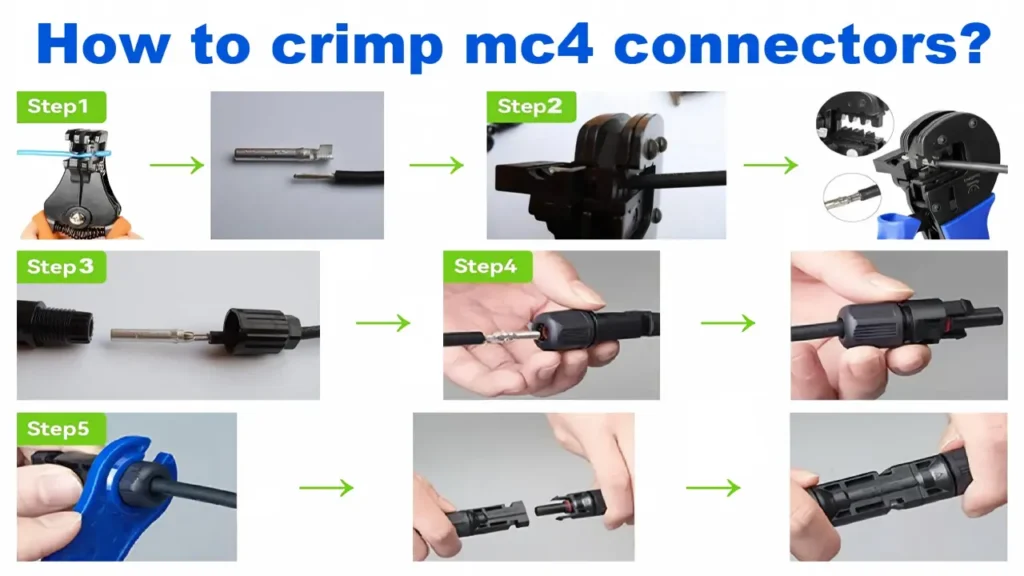
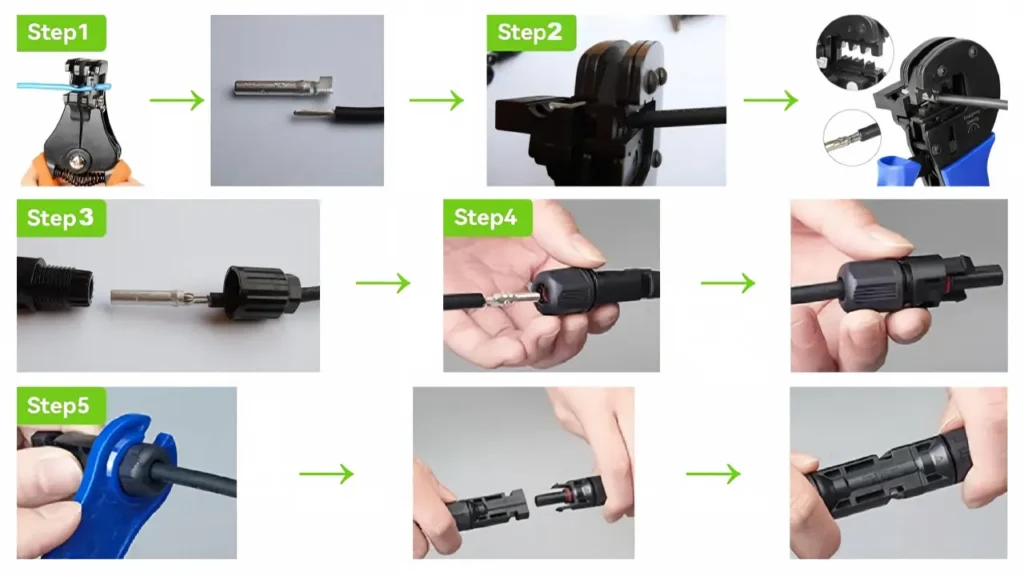
- Strip the cable. Remove 6–8mm of insulation from the cable end, being careful not to nick or cut any copper strands — a nicked strand reduces the effective conductor area right at the point that needs the most integrity.
- Twist the exposed strands together so none splay out or get left behind during crimping.
- Insert the stripped end into the male crimp pin, until the strands are visible at the small inspection hole near the pin’s base, with no copper exposed beyond it.
- Place the pin in the correct die slot of your MC4 crimping tool — most tools have a single dedicated slot for MC4-size pins.
- Squeeze the tool fully in one continuous motion until it releases on its own (most ratcheting crimpers won’t open until full pressure is reached — that’s intentional, not a malfunction).
- Slide the sealing components onto the cable first — end cap, then compression sleeve — before inserting the crimped pin into the connector housing. This step gets forgotten more often than any other; if you crimp the pin first and forget the cap, you’ll have to cut it off and start over.
- Insert the pin into the male connector housing until it clicks into place, then hand-tighten the end cap and finish with the MC4 wrench until there’s no visible gap.
How to Crimp the Female MC4 Connector [Step-by-Step]
The female side follows the same logic with two differences worth calling out.
- Strip and crimp the female pin using the same process as the male side — strip, twist, insert, crimp.
- Slide the end cap and rubber seal over the pin before inserting it into the housing — same ordering rule as the male connector.
- Insert the crimped pin into the female housing until it clicks. Female housings contain a non-return locking clip: once the pin is seated, it will not come back out without disassembling the connector, so double-check pin orientation and polarity before this step, not after.
- Hand-tighten, then wrench-tighten the end cap, checking for a fully seated seal with no visible gap — this is what keeps the connection IP67-rated once installed outdoors.
How to Test Your Crimp Before Installation
Crimping the pin is only half the job — confirming it’s actually good is what separates a reliable connection from a future service call.
The Pull Test
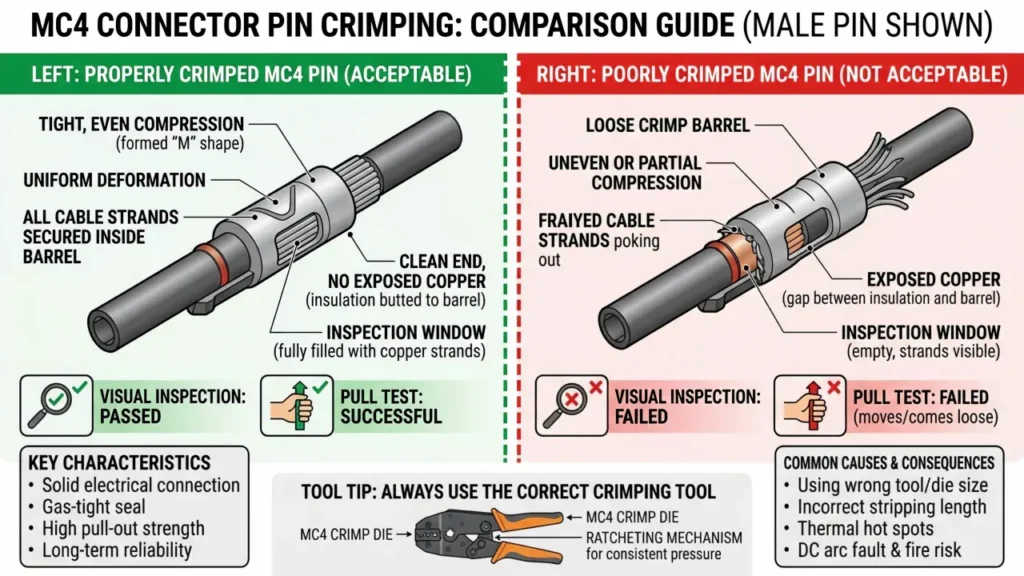
Firmly tug the cable away from the crimped pin. It should not move, slide, or show any strand separation. This won’t catch every defect, but it’s the fastest field check available and takes less than five seconds per connector.
Continuity and Resistance Check (Manufacturer’s QC Method, Simplified for DIY)
In production, we test crimped samples with a micro-ohmmeter, checking that contact resistance falls within a tight tolerance — typically well under 1 milliohm for a properly formed MC4 crimp. You won’t have factory-grade test equipment on a job site, but a standard multimeter set to continuity or low-resistance mode will catch an open circuit or a badly formed crimp showing unusually high resistance. If your multimeter shows unstable or fluctuating readings when you gently move the cable, the crimp isn’t seated correctly — redo it rather than trusting it in the field.
Common MC4 Crimping Mistakes (And What They Actually Cost You)
- Under-crimping — the tool doesn’t fully close, or a non-MC4-rated crimper is used. Result: increased contact resistance, which shows up as heat under load and accelerates over years of thermal cycling.
- Over-stripping the cable — exposed copper extends past the pin’s barrel. Result: exposed strands can short against the housing or corrode where they’re not protected by the seal.
- Forgetting the end cap and seal before crimping the pin — forces you to cut off a finished crimp and redo it, wasting cable and connector.
- Skipping the pull test — a crimp that looks fine visually can still slip under mechanical stress from cable movement, especially on rooftop installs exposed to wind and thermal expansion.
- Reusing a pin after a failed crimp — the metal has already been deformed once; a second crimp attempt rarely restores full contact area.
- Not checking polarity before the female pin locks in — because the non-return clip prevents removal, a reversed connection here means disassembling and starting over.
DIY Crimping vs Factory Pre-Assembled MC4 Cables: Which Should You Choose?
For a handful of custom-length extensions or repairs, crimping your own connectors is straightforward once you’ve done it a few times. But the calculation changes at project scale.
DIY crimping makes sense when:
- You need a small number of custom cable lengths
- You’re comfortable performing pull tests and continuity checks on every connection
- The install is low-risk (ground-mount, easily accessible for future inspection)
Factory pre-assembled cables make more sense when:
- You’re deploying dozens or hundreds of connectors across a commercial project, where crimp-to-crimp consistency matters more than any individual crimp
- Connectors will be installed in hard-to-access locations (rooftop, tracker systems) where a field failure is expensive to diagnose and fix
- You need documented QC data — resistance test records, batch traceability — for project sign-off or warranty purposes
Most contractors end up doing both: factory-terminated cables for the bulk of the array, with a crimping tool on hand for field adjustments and repairs.
A Manufacturer’s Quality Standard for MC4 Crimping
Because we produce MC4 connectors for large-scale solar projects, our crimping specification goes beyond “does it click.” Every production batch is tested against a defined pull-force minimum and a maximum contact resistance threshold before it ships, and we sample-test crimps throughout a run rather than only at the start — plating thickness and pin tolerance can drift slightly batch to batch, and that drift is exactly what shows up later as inconsistent heating across a string.
For teams crimping on-site, the practical takeaway is the same principle at smaller scale: don’t treat the first good-looking crimp as proof the next fifty will be identical. Spot-check pull tests throughout a batch, not just the first one — tool wear and operator fatigue both creep in over a long day of crimping.

Frequently Asked Questions
What tool do I need to crimp MC4 connectors?
You need a dedicated MC4 crimping tool, not standard pliers or a general-purpose crimper. MC4 pins require even, full-circumference pressure that only a properly sized crimping die can provide — pliers tend to crush the pin unevenly and leave weak spots in the connection.
Can I crimp MC4 connectors without special tools?
It’s not recommended. Improvised crimps with pliers or wire cutters often look acceptable but fail a pull test or show elevated resistance under load, which can lead to overheating. If you only need a connector crimped occasionally, it’s often cheaper and safer to buy a basic MC4 crimping tool than to risk a field failure.
How do I know if my MC4 crimp is good?
Perform a pull test — firmly tug the cable away from the crimped pin; it should not move or show strand separation. Follow up with a continuity or resistance check using a multimeter, since a crimp can pass a pull test but still have elevated resistance from incomplete strand contact.
What size wire works with MC4 connectors?
MC4 connectors are commonly used with 4mm² or 6mm² solar cable, depending on the current the cable carries and the length of the run. Check your connector and cable specifications together, since an undersized cable can be a bigger risk factor than the connector itself.
Why is my MC4 crimp loose after I finished it?
This is usually caused by an under-sized crimp die, a worn crimping tool, or stopping the crimp motion before the tool fully closes. Redo the crimp with a new pin — a pin that’s already been deformed once won’t seat properly on a second attempt.
How long does it take to learn how to crimp MC4 connectors properly?
Most people get a reliable technique after 5–10 practice crimps on scrap cable. The process itself takes under a minute per connector once you’re comfortable with it; the learning curve is mostly about developing a feel for how much pressure the tool needs and catching mistakes like forgetting the end cap before crimping the pin.
Do factory-crimped MC4 cables perform better than DIY ones?
Not necessarily on a single connector — a careful DIY crimp, tested properly, can be just as reliable. The real difference shows up at scale: factory production includes batch-level resistance testing and consistency controls that are difficult to replicate crimp-by-crimp in the field, which matters more on large commercial projects than on a single repair.